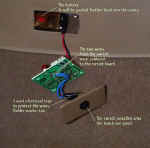

I don't have a blank spot on my dash to mount a button for my remote garage door opener, so I installed it on the knock-out cover on the driver's side of the console often used to install interior courtesy lights.
Here's what I did:
• Bought a Radio Shack Momentary Push Button -- part #275-644 ($1.69) -- and, since I didn't already have one, a Soldering Iron -- Radio Shack #64-28028 -- ($7.99).
• Took my remote garage door opener apart. (Be sure to see if the circuit board will fit in the opening on the console before continuing.)
• Soldered two pieces of wire to the Circuit Board of the remote garage door opener. I figured out the correct terminals were on the board directly on the opposite side of its switch. (Easy to find by trial and error.)
• Popped off the knock-out cover on the driver's side console that is often used for interior courtesy light kits.
• Drilled a 1/2" hole in the center of the knock-out cover.
• Attached the switch in the hole on the knock-out cover.
• Attached the two soldered wires from the circuit board to the momentum switch terminals and protected them with electrical tape. (some may want to solder the wires.)
 Once everything was connected together (see photo), I pressed the button to
see if it worked. I then pushed the battery into the cavity and back to the
left. The card was then pushed in after the battery and then the knock-out cover was
re-attached.
Easy as pie and convenient, too.
Changing the battery will be quite simple: just pop off the
knock-out and pull it out.
In my case I used the same Radio Shack button, but placed it in the Fuse Box Cover Plate in my NB. This location is on the left hand side and you are less likely to hit it with your knee on the right hand side.
| Back to the Garage | 29-Jun-2009 |
| [Home] - [FAQ] - [Search] - [Sponsors] - [Forums] |
| [Garage] - [Clubs] - [Contact Us] - [Disclosures] - [More...] |
Copyright
©1994-2022, Eunos Communications LLC
|