I went to open my glove box the other day and it dropped to the floor, hanging
from the right side. The plastic post that holds the screw had broken, letting
the whole box drop. Before paying a dealer for a new glovebox, I decided to try
and fix what I had. On a scale of 1 (unscrew a light bulb easy) to 10 (engine
rebuild difficult), I'd rate this a 3 due to the use of epoxy.
The Tools
It doesn't get much simplier than this:
- #2 Phillips (i.e., a medium cross-head) screwdriver
- 2-part quick-set epoxy (cures in one-minute)
- aluminum foil
- toothpicks
Removing the Glovebox
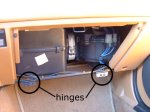
| The glove box is a one-piece affair. There are a pair of metal
hinges that are attached to each side the glove box. The hinges in turn
are attached to a metal cross-bar that spans the dash opening. Each side
of the hinge is attached with just one screw. (See Figure 1.)
[Note to nitpickers: The screw on the right-side hinge is temporarily
in place so I don't loose it. It actually goes through the hinge from
the other side.]
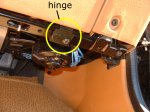
To remove the glovebox, reach under the bottom edge of the dash and
find the retaining screws. (See Figure 4.) Using a #2 Philips screwdriver,
remove them and the glovebox should drop out of the opening with the hinges
still attached to it.
In my case, the glove box only had one screw left holding it in place.
I unscrewed it from the glovebox and the glove box came right out. I then
removed the hinges from the metal cross-bar.
|

Figure 1. Hinges |
First Try
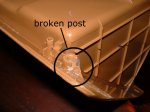
| There is a post on each side of the back of the glove box,
into which the hinge retaining screw is secured. In my case, the post on
one side was broken. (See Figure 2.)
The post had broken cleanly into two parts, which simlified the repair.
First, clean the mating edges of the broken post with isopropyl (rubbing)
alcohol. Let it dry. I used a two-part epoxy that cures in one-minute.
Following the directions, I mixed the epoxy on a folded up piece of aluminum
foil using a toothpick, and applied it sparingly to the mating surfaces
of the post. I then pressed the surfaces together and let the epoxy cure
for an hour. I mixed some more expoxy and liberally coated the outside
of the post and it's reinforcing braces. I let that cure overnight.
The next day I positioned the hinge on the posts (there is a second
post that aligns the hinge) and screwed it in place. I wasn't real surprised
when the screw forced the post apart again at the break. I suspect some
of the epoxy seeped into the hole in the post, which interfered with the
screw and forced the issue.
Time for Plan B.
|

Figure 2. The Post |
Second Try
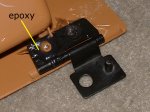
| For my second attempt, I decided to use the epoxy to hold it
all together, with the screw just acting as a locating pin. I mixed up another
batch of the quick setting epoxy and liberally applied it to the posts (without
the broken pieces), filling the remainder of the screw hole with epoxy.
I then set the hinge in place, settling it into the epoxy. I "screwed"
the screw into it's hole, and applied more epoxy to the screw and locating
post. I let it dry overnight. (See Figure 3.)
The next morning, I gingerly tested the strength of the repair by trying
to twist and move the hinge. It seemed secure, so I proceeded to put the
glovebox back in it's place.
|

Figure 3. Epoxied Fix |
Securing the Glovebox
| With the glovebox hinge back in it's place, it was time to
put it back in the car. First, secure the hinges to the glove box using
the Phillips head screws. The hinges are left and right sided, but go on
only one way.
In side the car, put the glove box into position. Slide the box up into
it's opening, making sure the lip on the back of the glovebox is behind
the latch at the top of the dash opening. Close the glove box, and position
it so that the guide pins on the hinge fit into their respective holes
on the dash cross-bar. Once the glovebox is in position, secure it with
the two Phillips head screws. (See Figure 4.)
###
|

Figure 4. Bottom View |
| Back to the Garage |
27 October, 2002
|


